In this article I will be looking at the different types of picture hanging hardware, the pros or cons of each, and which ones I prefer to use. This will be just an overview of the different categories and I will be going into greater detail in a later series of articles.
If you have ever tried to hang anything on your walls then you surely have gone to your local family owned or big box chain hardware store and seen all the different types of hanging hardware. You look through all the different clear plastic packages at the pieces of shiny metal and brightly colored plastic inside wondering which ones you should use. Scrolling on your phone for a few minutes trying to see if you can find any helpful information on the internet while standing in the aisle to no avail, you then pick the cheapest one because you really don’t have a clue what you need. This is a common experience for the inexperienced. From Sawtooths, Wall Buddies, and D-rings, to Hooks, Anchors, and Cleats there is a variety of things to sort through. Some go on the piece you are trying to hang and others attach to the wall. It can be confusing while trying to sort out which is which without any prior experience and knowledge. That is where this article comes into play for you. I’m sure you can find an article or two from a handyman or interior designer online, but this will probably be the only article you find online written by a professional art installer who only hangs things on walls all day, every day, full time and has been doing it for more than nine years. I have run into almost every situation and problem that can happen but I still learn something new every now and then. Hopefully you will learn something new from this article that helps you get your project finished with the least amount of hassle.
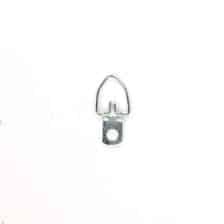
D-rings:
Shown above is a narrow single hole D-ring. These are attached to the back of the piece you are trying to hang and the hook or screw goes through the loop at the top. D-rings of various sizes and styles are made and they are the piece of hardware I use the most on the backs of the pieces I am hanging. They are versatile and easy to use.
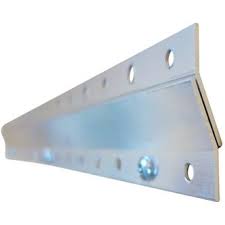
Cleats:
Pictured above is a Metal Cleat. They can be made of metal or wood. These are used in sets of two, they attach to both the back of the piece and the wall. The Cleat attached to the back of the piece slides down on top of the Cleat attached to the wall as shown in the picture above. They are best for extremely heavy pieces but can be used for pieces of any weight and size. The down side to these is that the longer the Cleat set you are using the more difficult it is the properly seat the cleat attached to the back of the piece onto the cleat attached to the wall. The wall must be flat with very little curvature in it for these to work easily, and most walls are not. Cleats are prone to damage walls that are not perfectly flat.
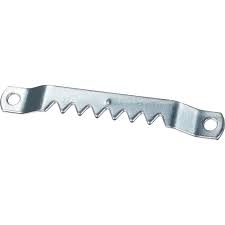
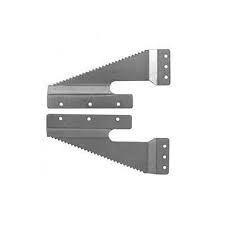
Sawtooth:
In the picture above is a metal sawtooth. These are made in various sizes and styles like D-rings. These are attached to the back of the piece and are seated on top of a screw or nail. Sometimes they can make a piece hang more parallel and flatter to the wall, but they must be placed in the exact right spot and cannot be more than 1/16th of an inch out of place to work correctly. They can be very hard to use if not attached in the correct spot. Because of this reason I generally do not use these.
Wall Buddies:
Shown above is a Wall Buddy. These are a variant of the Sawtooth. They are a little more forgiving then the Sawtooth. Like the sawtooth they seat on top of a screw or nail. I never use these because they take to long to attach to the back of the piece correctly and have no added benefit over D-rings in my opinion.

Euro Hangers:
This variant of the D-ring in the picture above is used for metal frames. There are a few different designs that I have seen through the years. Some designs work better than others. The design shown above is simple and easily adjustable. One problem with Euro Hangers is that sometimes the hole for the hook is to small for the appropriate sized hook for the weight of the piece, another problem is they can be hard to get on the hook because of how flat they sit to the frame. With practice it gets easier to use these but they still are difficult to use sometimes.
While not being an exhaustive list of all the hardware used to attach to the back of pieces those are the most common ones I see, and in order to not take up to much of your time I won’t go into the rest of them because they are not necessary to use when the above choices are readily available. now lets look at some of the more common hardware used that is secured to the wall.

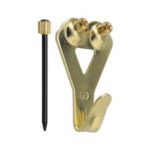
Hooks:
Pictured above are the two most common variants of the Picture Hook. The Hook on the left is my go-to for everyday picture hanging. I use these 95% of the time I am hanging framed pieces. It works great for standard drywall and wood veneer paneling. The hook on the right works better for plaster, stucco and solid wood walls because of the shape and metal alloy used to make the nail. I usually only use them on plaster walls.
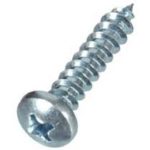
Screws:
Pictured is a Phillips Pan Head Sheet Metal Screw. There are literally hundreds of variations to the screw. Whether it is the type of drill tip it accepts, type of metal alloy it is made of, the size of the threads, or the number of threads per inch (thread count) there are a mind boggling number of choices. The one shown above is the only type I will use. I have it in #6, #8, and #14. I have them in many lengths from 3/8 inch to 3 inch. I use them to attach hardware to the backs of pieces, and also on the wall itself. If it is drywall, stucco, cement, cinderblock, brick, tile, or stone I use it with an alligator wall anchor. If it is wood I use them without the wall anchor. The drill tip they accept, metal alloy they are made of and the size of the threads make this the best screw that I have found for hanging pieces . They are cheaply priced and readily available at all hardware stores. I am going to say this because I see it all the time. Do not use drywall screws to hang pieces. They are made to attach drywall to wood studs, not hang pieces from the wall. The heads snap off easily and the threads pull out of the wall when used to hang pieces. Yes, I have seen pieces fall because someone hung it on a drywall screw on many occasions.
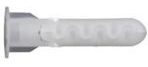
Alligator Wall Anchor:
There are just as many wall anchor variants as there are types of screws. I only use the one pictured above for pieces up to about 10-15lbs per anchor. It has proven itself to be the strongest and most superior design. It is cheap, easy to use, and does minimal damage to your walls. I use them with screws in drywall, stucco, cement, cinder block, brick, tile, and stone walls.
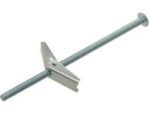
Snap Toggler:
These work for heavier pieces in place of screws and Alligator Anchors. In drywall they hold up to around 60lbs a piece. In cinder block walls they are rated up to 250lbs. They are great for heavy pieces, especially if studs can’t be used because of placement of the piece.
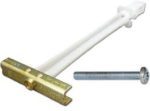
Mollies:
These are basically the same as the Snap Toggler but with a different design. They come in several sizes. I use them when Alligator Anchors are to small and Snap Togglers are to big. I wouldn’t put more than 20-30lbs on one small one. They are really good to use with Metal or Wood Cleats.
That is all of the more common pieces of hardware I see at my job. I hope you find this article useful in researching for your next DIY project. In the future I will go more in depth on some of the hardware listed above. Until then try not to put to many extra holes in your walls, sometimes they won’t be covered by the piece you are trying to hang.
John Stuckey
Art Installation Professionals
Aip-houston.com

Recent Comments